

A flipping house inspection checklist for Norfolk should cover the home’s major systems and finishes, then record each repair, its quantity, and an estimated cost. Fresh paint or new flooring can conceal costly concerns. Document what needs attention before setting the renovation budget.
It’s easy to focus on visible updates, but the roof, foundation, plumbing, electrical components, and signs of water damage can change a flip’s scope. A consistent, room-by-room checklist helps capture issues and keep repair notes useful when planning the work.
Use these practical checks for key systems, bathrooms and kitchens, walls and floors, and the exterior. You’ll also learn how to record repair needs, quantities, and cost estimates, and what to expect when arranging a home inspection in Norfolk. The aim is a clearer picture of the property before making renovation decisions.
Key Takeaways
- Check bathroom fixtures, plumbing, and nearby surfaces for leaks, water damage, and signs that may point to a larger repair.
- Review electrical panels, wiring, outlets, switches, and other visible components to flag concerns for your renovation plan.
- Record each repair with its location, scope, quantity, and estimated cost so your budget reflects the work the property needs.
- Inspect walls, windows, doors, and flooring for damage or wear, and note how each issue could affect finish work.
- A Premier Home Inspection’s New Construction Phase Inspections can help identify property concerns during construction, before they’re harder to address.
Bathroom fixtures, plumbing, and water damage
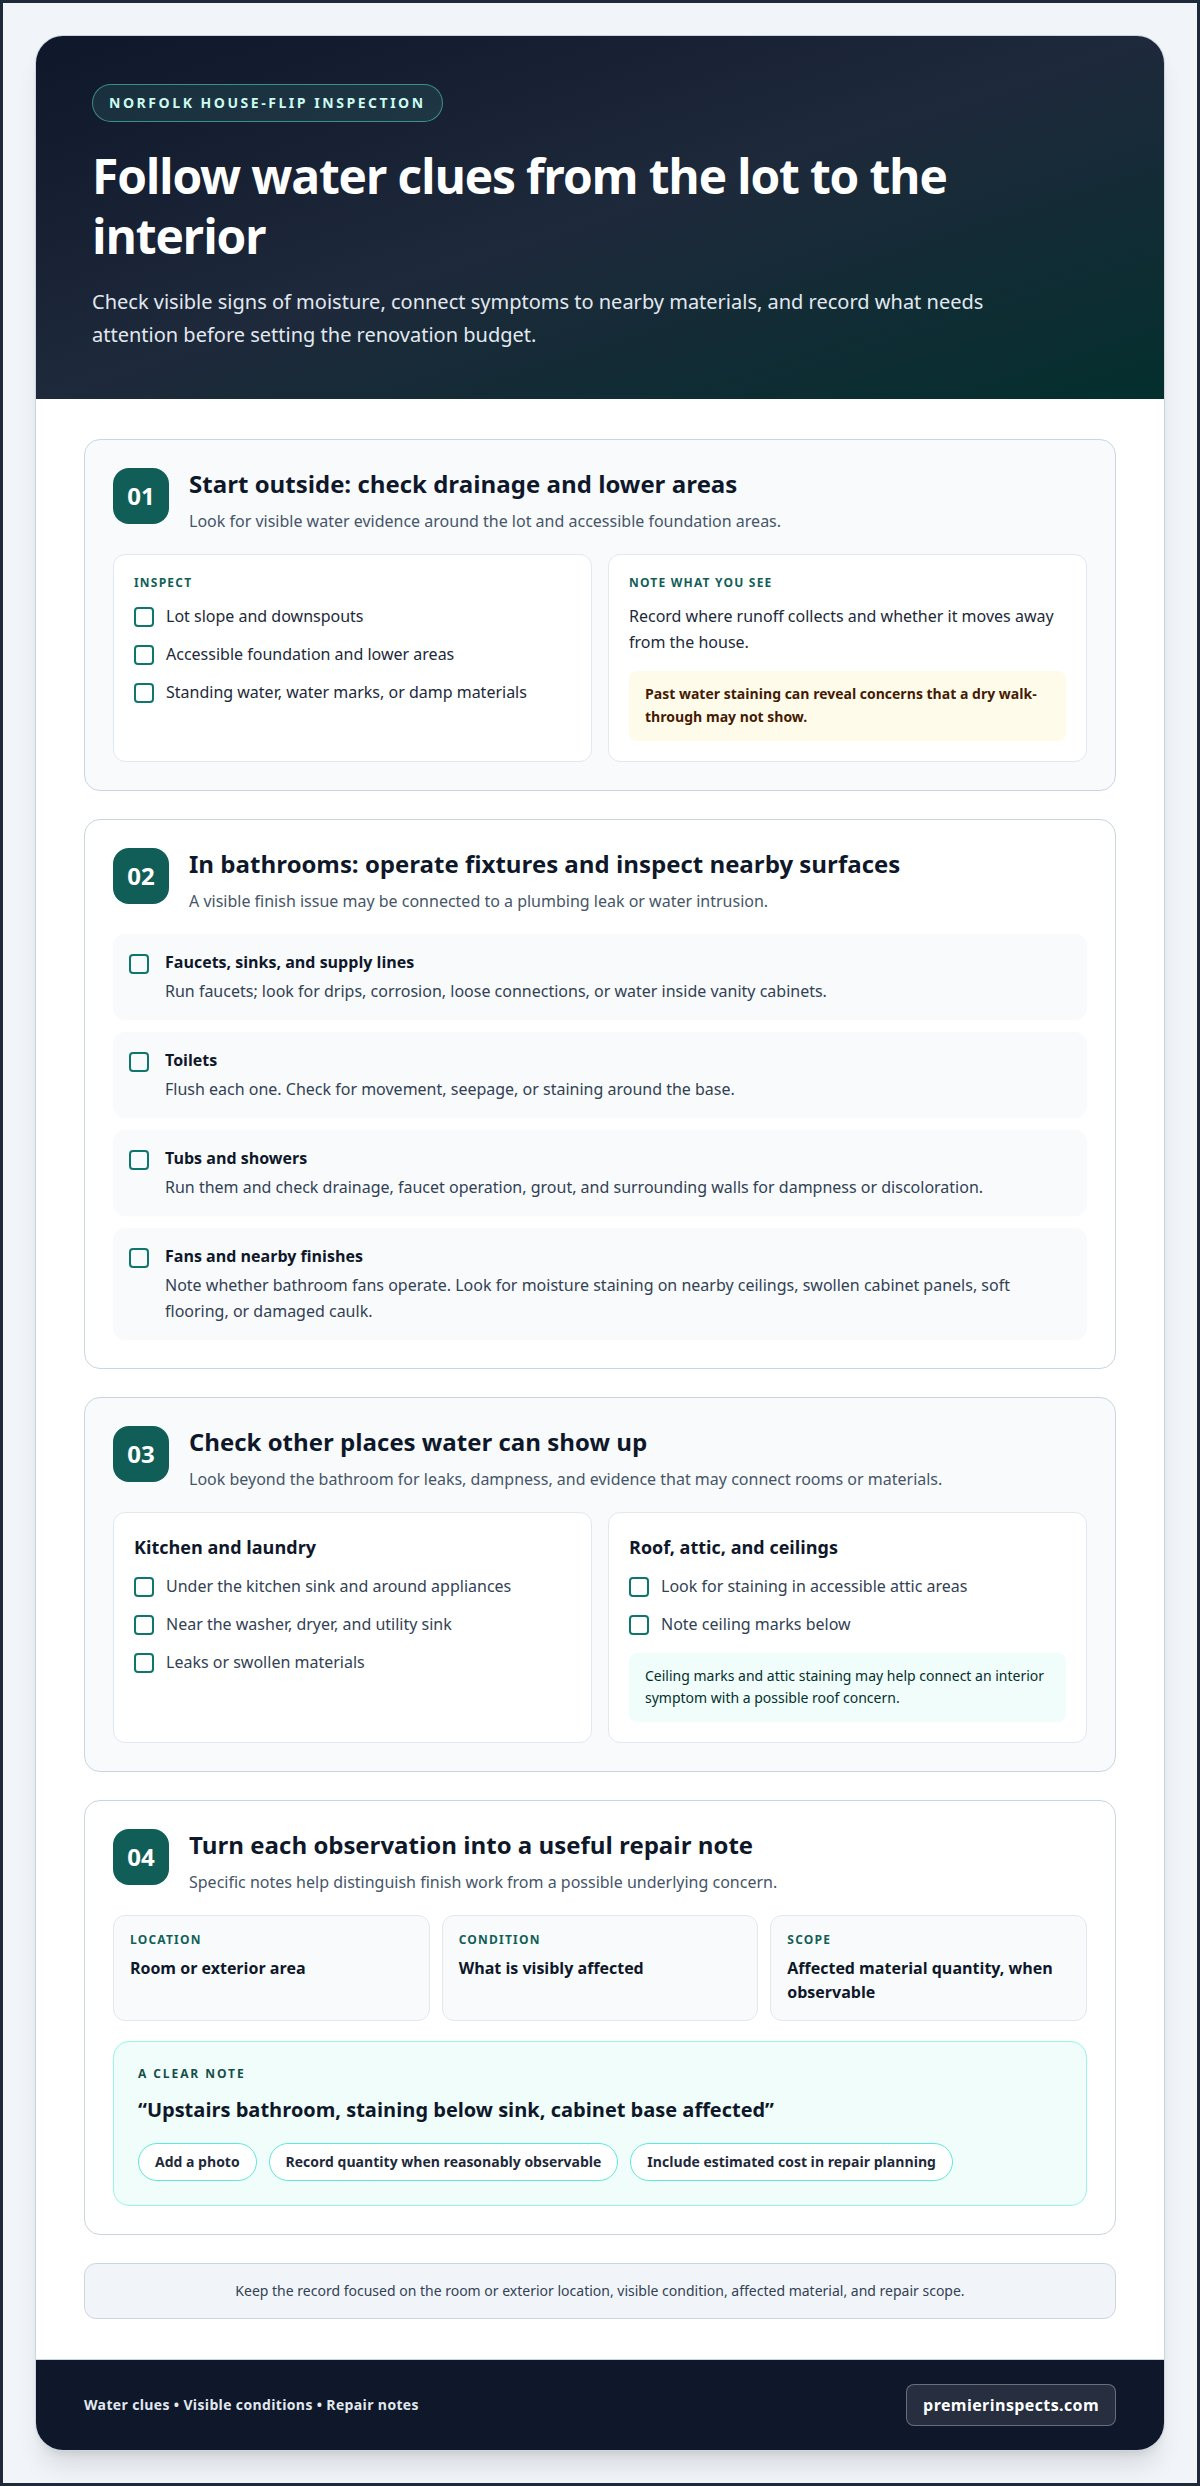
To assess flooding, storm surge, and drainage risks in Norfolk, examine the lot’s slope, downspouts, foundation, and accessible lower areas for standing water, water marks, or damp materials. Note where runoff collects and whether it moves away from the house; past water staining can reveal concerns that a dry walk-through may not show.
Bathrooms offer useful clues about plumbing condition. Run each faucet, flush toilets, and operate tubs and showers. Record leaks, slow drains, loose fixtures, or changes in water flow. Look beneath sinks and around toilet bases for staining, swollen cabinet panels, soft flooring, or damaged caulk. These visible details may connect a finish problem to a possible leak.
- Check faucets, sinks, and supply lines. Look for drips, corrosion, loose connections, and water inside vanity cabinets, since even a small leak can damage nearby finishes.
- Flush each toilet and inspect its base. Movement, seepage, or staining around the floor may indicate a repair need beyond replacing a worn seat.
- Run tubs and showers. Check drainage, faucet operation, grout, and the surrounding wall for dampness or discoloration that could point to water intrusion.
- Inspect bathroom fans. Note whether each fan operates and whether the ceiling nearby shows moisture staining, since poor ventilation can leave visible damage.
- Look for water damage in kitchens and laundry areas. Inspect beneath the kitchen sink, around appliances, and near the washer, dryer, and utility sink for leaks or swollen materials.
- Check the roof and attic for leak evidence. Look for attic staining and note any ceiling marks below, which can help connect an interior symptom with a possible roof concern.
- Review the foundation and nearby drainage. Record standing water, dampness, or water marks around accessible foundation areas because drainage problems can affect more than one room.
Review heating, cooling, plumbing, and appliances as connected parts of the property. Operate accessible controls, note whether heating or cooling responds, and look for visible leaks around plumbing connections and appliances. Record damaged or obstructed heating ducts or vents, and note appliances that fail to operate. This helps distinguish finish work from system concerns.
A house inspection should cover the roof, visible plumbing, electrical components, heating and cooling equipment, and accessible areas for signs of damage. Record visible wood damage or suspected pest evidence as an observation. Pest and termite assessment is not part of a standard home inspection.
For each concern, record the room or exterior location, visible condition, and affected material. For example, write “upstairs bathroom, staining below sink, cabinet base affected” rather than “plumbing issue.” Add a photo and the quantity of affected material when it can reasonably be observed. This gives renovation planning a clearer starting point.
Electrical panels and wiring
A flipping project’s electrical scope can hide behind ordinary-looking switches and outlets. Check the visible condition of the electrical panel, wiring, switches, outlets, ceiling fans, doorbell, and security system. Note damaged covers, exposed wiring, loose outlets, or components that don’t respond. Don’t remove panel covers or handle wiring during a walk-through. A qualified inspection can assess visible concerns and identify where further evaluation may be appropriate.
Start at the service panel. Record its location and visible condition, including rust, impact damage, or missing covers. Do not touch the panel or approach it if you notice unusual warmth or an odor. Observe whether labels identify the circuits clearly, since unclear labels can complicate renovation planning. A clean exterior does not prove every circuit works properly. An inspection documents observable conditions, not concealed wiring.
- Test accessible light switches. Note switches that fail to operate a light or appear loose, since each may require follow-up.
- Check accessible outlets. Record cracked or loose receptacles and outlets that don’t respond to a basic functional check.
- Observe ceiling fans. Note wobbling, unusual noise, or controls that don’t operate the fan as expected.
- Check the doorbell and security system. Record whether accessible controls and visible components respond, without treating that observation as a full system test.
- Inspect the garage door system. Note visible damage and whether accessible controls operate the door during the inspection.
- Document exposed or damaged wiring. Record its exact room or exterior location so the concern can be evaluated before finish work conceals it.
Electrical observations can overlap with heating and cooling. Check accessible thermostats and controls, then note whether the system responds when operated. Record unusual sounds, visible damage, or airflow concerns at accessible vents. A system that does not respond may need further evaluation; don’t infer the cause from a symptom alone. Keep HVAC and electrical notes separate, while cross-referencing any issue that affects both.
Use the same details in each report entry: room, component, observed condition, and a photo when useful. For example, “hallway, outlet loose at wall, faceplate cracked” is clearer than “electrical problem.” Count affected outlets or switches when possible, and distinguish visible defects from areas you could not access. This makes repair quantities easier to include in renovation estimates.
Electrical panels and wiring deserve careful documentation before demolition or finish decisions. A Norfolk home inspection appointment can help assess visible electrical conditions alongside other property systems.
A house-flipping walk-through checklist can include wiring, switches, outlets, ceiling fans, the circuit breaker, doorbell, security system, garage door, and HVAC.
Recording repair needs, quantities, and estimated costs
A useful repair log turns walkthrough observations into a workable renovation budget. Give each item a location, condition, quantity, and estimated cost. A flipping house inspection checklist Norfolk investors can update should make each repair easy to locate and price. “Replace damaged flooring” is vague; “remove and replace flooring in the rear bedroom” identifies the area and task. Add a photo and note whether the concern affects one component or several connected finishes.
Build the record in a spreadsheet or inspection worksheet, with separate columns for these details:
- Location: Identify the room, floor, or exterior area, such as “kitchen, beneath sink.”
- Observed condition: Describe what is visible, such as staining, cracked tile, or a loose outlet.
- Quantity and unit: Record countable items or measurable areas, such as two damaged doors or flooring measured by area.
- Work description: State the task clearly, such as patch drywall, replace a fixture, or repair trim.
- Estimated cost: Keep the estimate beside its assumptions, including material, labor, and access needs.
- Priority and status: Mark items requiring evaluation, budgeting, or completion before finish work.
Separate visible symptoms from assumed causes. A ceiling stain is an observed condition; a roof leak is one possible explanation until its source is established. Keep the notes distinct. This prevents an early estimate from treating an unconfirmed cause as a defined repair, while preserving the issue for follow-up.
Quantities make estimates more useful. Count affected windows, doors, fixtures, or outlets when visible, and measure flooring or wall areas where practical. If a room has flooring wear in multiple places, record each damaged section separately. Group identical work only when locations and materials match. Flag concealed areas that cannot be measured instead of inventing a quantity.
Estimate repair costs as project line items, not as one broad renovation allowance. Separate materials, labor, access, disposal, and follow-up evaluation where those factors apply. Costs can change with property size, age, location, material selection, and the extent of hidden damage. Keep the assumptions beside each estimate so revisions have a clear reason. Set inspection expenses apart from repair costs; inspection pricing depends on the property and inspection scope, with the amount provided after a quote request.
Inspection findings are most useful when they identify observed conditions, accessible systems, and areas that may need further evaluation. A flipping house inspection checklist Norfolk investors maintain can link each finding to photographs, the inspection report, and later repair estimates. This gives budget revisions a traceable basis and helps keep potential work visible during renovation planning.
Walls, windows, doors, and flooring
Walk through each interior room from the entry to the far wall, checking finishes in a consistent order. Look for cracks, bubbling paint, stains, loose trim, and uneven flooring. Record whether a defect appears isolated or continues across a wall, doorway, or adjoining room. For example, note a sticking door and a sloped floor separately rather than combining them in one vague entry.
- Inspect walls and ceilings for visible defects. Note cracks, peeling paint, patching, discoloration, or soft surfaces because these conditions may require different repair scopes.
- Check window panes and screens. Look for cracked glass, torn screens, gaps, and damaged frames, since each can affect the window’s condition and planned finish work.
- Operate accessible window latches. Record latches that stick, fail to engage, or appear damaged because function matters alongside the window’s appearance.
- Open and close interior and exterior doors. Note rubbing, sticking, damaged edges, or doors that don’t sit squarely, as these observations help define adjustment or replacement needs.
- Test accessible door locks. Record locks that bind or fail to operate smoothly because they may need attention before the property is ready for occupancy.
- Review trim and paint around openings. Look for separation, gaps, peeling, or patchy repairs near windows and doors, where finish defects can be easy to miss.
- Walk flooring in each room. Note lifted edges, cracked tiles, worn areas, soft spots, or transitions that feel uneven because these affect both quantity estimates and finish planning.
- Inspect visible roof, chimney, window, and door conditions. During a winter-preparation review, Norfolk landlords should inspect these areas, so document visible damage that may affect weather protection.
- Check fireplaces and chimneys for visible deterioration. Note damaged masonry or surrounding finish concerns because they may require further evaluation before renovation decisions.
For homes built before 1978, FHA appraisals check for cracking, peeling, or chipping lead paint. Note the affected surface and location, such as a bedroom window casing, so the condition stays distinct from ordinary paint touch-ups. Don’t treat appearance alone as confirmation of paint contents.
Separate cosmetic wear from defects that affect operation. A scratched door may need finish work, while a door that binds needs a functional note. Apply the same distinction to a cloudy window pane and a damaged latch. This makes the Norfolk flip checklist more useful when deciding which repairs are cosmetic and which need further assessment.
Keep the review consistent from room to room. A house-flipping walk-through checklist can include window panes and screens, window latches, doors and locks, trim, walls and paint, and flooring. Grouping these observations makes the review easier to follow.
When preparing a Norfolk property for winter, include visible checks of the roof, chimneys, fireplaces, windows, and doors.
Home inspection services in Norfolk
A private home inspection and a municipal building inspection serve different purposes. A private inspection documents visible property conditions; Norfolk’s permit-related inspections concern permitted work. For next-day municipal inspections, requests must be made before midnight, and results can be emailed to up to three registered email addresses designated by the permit applicant.
What permits are required in Norfolk for renovation work on a flipped house? There isn’t one permit list for every project; requirements depend on the planned work. Identify structural, electrical, plumbing, and heating or cooling changes separately, then determine applicable Norfolk permits before work begins. A home inspection report does not authorize renovation work.
What are Norfolk’s historic district rules for renovating or flipping a home? Requirements depend on the property’s location and proposed work, particularly exterior changes. Find out whether the home is in a historic district before finalizing exterior materials or scheduling work, and account for any applicable review in the project plan.
What are the biggest risks when flipping older homes in Norfolk, including lead paint and asbestos? Hidden deterioration, outdated systems, water intrusion, and hazardous materials can affect scope and budget. For FHA appraisals, homes built before 1978 are checked for cracking, peeling, or chipping lead paint. Suspected asbestos-containing material needs separate attention; don’t disturb it during a walkthrough.
A typical home inspection takes 2-4 hours, and the report is typically provided within 48 hours. Use the inspection to document observable conditions across the property, then keep the report with your repair log and renovation estimates. It helps distinguish visible defects from concerns that need further evaluation, but it isn’t a contractor’s quote or a municipal permit approval.
For Norfolk flips, define the inspection scope around the property and the decision you need to make. A standard home inspection assesses visible, accessible systems and finishes; a sewer scope or pool and spa inspection addresses a specific feature. Pest and termite damage isn’t covered by a standard home inspection, so suspected damage needs a separate evaluation from specialists like Hughes Termite Control. A clean visual walkthrough does not prove concealed areas are defect-free.
Choose an inspection that provides clear findings you can use. Look for room-by-room observations, photographs where useful, and repair concerns described by location and condition. “Rear bedroom window latch sticks” is more useful for renovation planning than “windows need work.” Keep the report, permit records, and contractor estimates organized together so each decision connects to documented property conditions.
A Premier Home Inspection: New Construction Phase Inspections
A Premier Home Inspection helps Norfolk property buyers document visible conditions before renovation decisions. For an existing house you’re considering as a flip, a Buyer’s Home Inspection can provide findings to inform repair planning and budgeting. It documents observed concerns, not renovation costs or contractor bids.
For a property still under construction, New Construction Phase Inspections provide an inspection option during that process. An 11th Month Warranty Inspection is suited to a home approaching its warranty period. The right fit depends on the property’s stage and your reason for arranging an inspection, whether you’re evaluating a purchase, construction, or an approaching warranty deadline.
Bring the property details and your main inspection goals, such as documenting visible conditions before setting a renovation scope. Contact A Premier Home Inspection to discuss a Buyer’s Home Inspection for your Norfolk property.
Turn your findings into a confident next step
Use a flipping house inspection checklist for Norfolk to create a record before deciding whether to proceed with renovation. The next step is to identify which findings affect project scope, sequencing, or whether the property fits your investment goals. Treat this as a deliberate decision point, not an automatic move into demolition.
Review the inspection findings alongside your acquisition assumptions. Separate concerns that need to be understood before planning from finish choices you can make later. Keep notes in one working file and update them as new information changes the scope. Planning is easier when each change has a documented reason and a clear place among your priorities.
If you’re assessing a purchase or planning an inspection at another stage of ownership, choose a service that fits the property’s timeline. Clear information can support your next decision and keep the project grounded in the home’s observed condition.
Take the next step with a practical plan and move your Norfolk project forward with confidence.
Frequently Asked Questions
What should a house flipper inspect before buying a property in Norfolk, Virginia?
Review the property’s visible condition and identify issues that could change your purchase or renovation plan. Assess the roof, foundation, structure, electrical, plumbing, HVAC, and interior finishes, then connect related observations. For example, a sloping floor near a doorway deserves a precise location note and further assessment, not an assumed repair diagnosis. A Buyer’s Home Inspection can provide documented findings to support a purchase decision, but it doesn’t replace permit or code inspections.
What are common structural and foundation issues in Norfolk homes?
No single issue applies to every Norfolk home, so focus on observable clues and how they relate. Note foundation cracks, separation around openings, uneven floors, or doors that bind, recording where each appears. One symptom doesn’t establish its cause, but related observations can indicate areas needing closer evaluation. Add photographs and precise locations, then use the documented findings to plan appropriate follow-up before committing to structural work.
How much does a home inspection cost in Norfolk, Virginia, and what add-on inspections are recommended?
Inspection pricing depends on the home’s size, age, and requested add-on inspections. Contact A Premier Home Inspection for a same-day quote. Choose add-ons based on the property’s features and concerns: a Sewer Scope Inspection can provide information about the sewer line, a Pool and Spa Inspection applies when those features are present, and Thermal Imaging can help investigate an observed concern. The inspection scope shapes the quote.